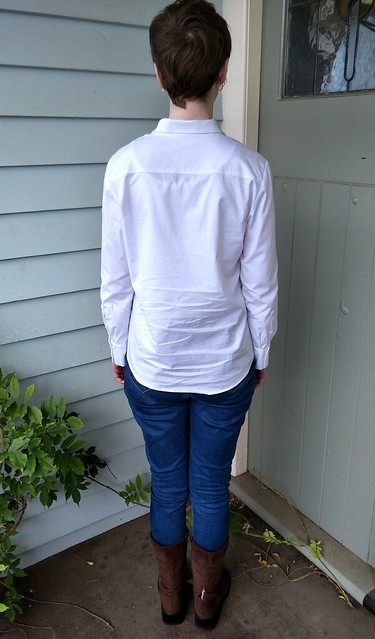
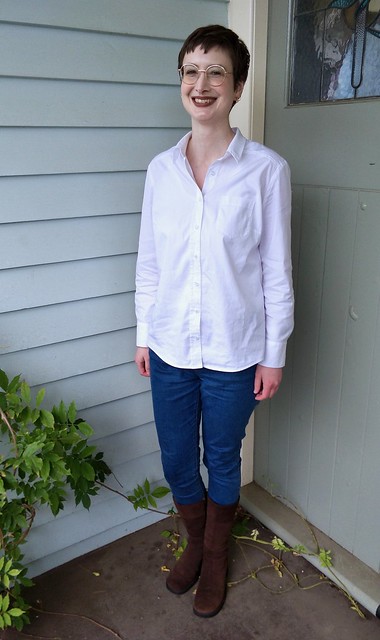
If you’re a regular reader of my blog, you’ll know my love for Burda and their shirt patterns in particular. A couple of years back, I made the Burda 04/2010 #114 long-sleeved blouse which became my most-loved and worn button up shirt. When it finally hit the dust (RIP shirt), I didn’t think twice before replacing it.

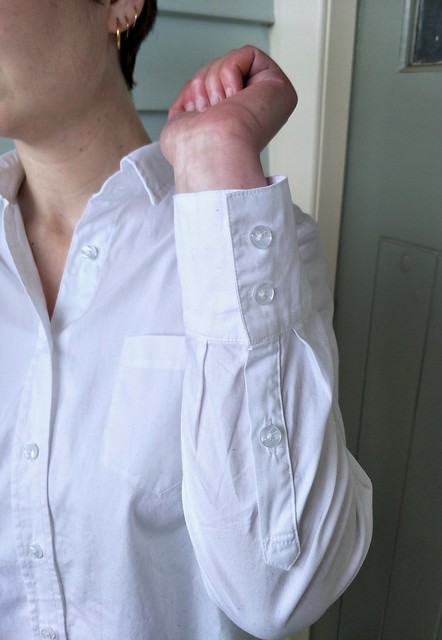
This time round, I sized up in the shoulder for a bit more breathing room, and a more even transition to the larger hip curve. I repeated my stylistic change of adding a tower placket to the shirt sleeve, with a cuff to match, and reduced the sleeve cap ease as needed (I’ve noticed Burda drafts very puffy sleeve caps).
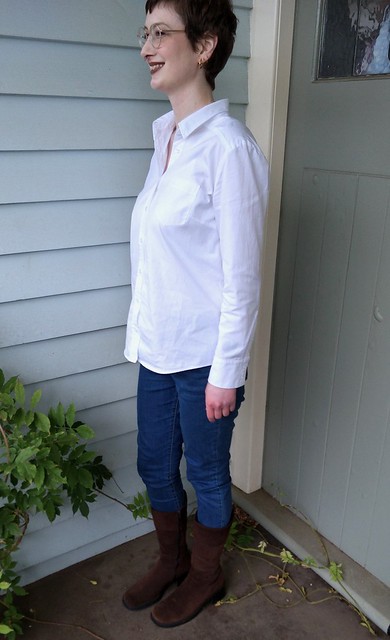
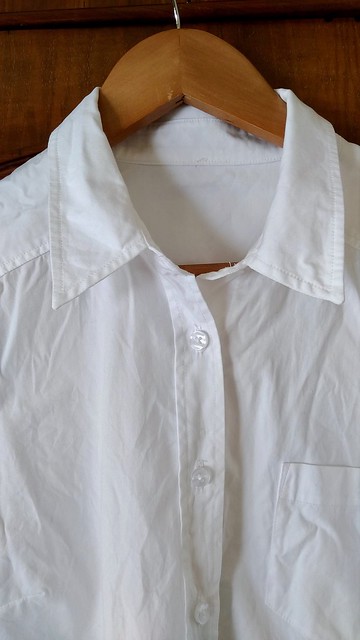
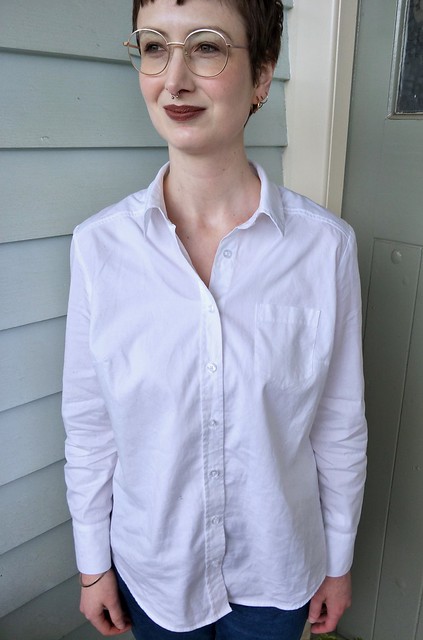
The right button placket was created using my favourite technique, with a fold-under placket on left. This allows each front half to be cut in one piece, rather than fiddling with tricksy button band pieces (which have to be interfaced, ugh). I also felt it matched the fabric in giving the shirt a classic men’s formal shirt vibe, a la Turnbull & Asser.*
As my previous shirt was made from a hole-ridden nightmare, I decided to treat myself to some Robert Kaufman shirting fabric. This is his Ivy Pinpoint Oxford which I bought from Fabric.com – a decision I did not make lightly considering the abysmal Aussie dollar and outrageous international postage costs.
I was not disappointed with my purchase. This fabric is so thick and lush, with a beautiful hand. It’s something I would imagine a formal men’s shirt would be made from. While thick and almost stiff during sewing, the fabric softened up to the most buttery feel with a lovely drape after washing.** Partnered with some thick buttons from Aliexpress, it just makes this shirt feel so damned fancy. (I buy all my buttons there now as the quality and price is unsurpassed.)
What I am displeased with is the couple of little stains on my beautiful expensive cotton shirting. Despite using Frixion pens for years without issues and even testing them on this fabric specifically, for some reason the purple pen I used to mark the CB collar line left a faint, but noticeable, stain.*** (I marked the CB line as I’d sewn and fucked up the collar twice already, and was slightly cavalier in my frustration to cut the third from whatever minute scraps were remaining.)
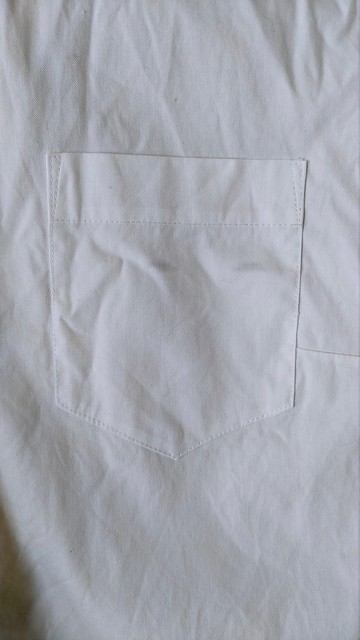
There is also a brown mark in a portion of the pocket topstitching, which I at first assumed was the same. Upon closer inspection, it looks like the thread in that area had picked up some machine oil, which of course refuses to totally wash out. Now that I’ve worn and washed it a few times, I don’t really care, but it’s one of those niggly things that drives you to distraction when you’re deep in the zone of a particular project.
So, this is basically the perfect shirt for me. If I was being picky, I’d shorten the cuffs slightly as they drape a little over my hands when unbuttoned, but it’s nothing that will stop me wearing this shirt all winter long. Isn’t it nice when you’ve finally perfected a pattern (+ fabric combo) to your liking?
The deets:
Pattern: Burda Long Sleeved Blouse 04/2010 #114
Pattern details: “This classic long-sleeve button-up blouse features a single breast pocket and darts for a flattering and feminine fit. Make it in a bold kelly green or orange and pair with white trousers for a clean summer outfit.” Available from Burdastyle magazine, April 2010, or as an A4 PDF download. Sizes 38-46. No seam allowances added. PDF comes with 2 shirt and 1 dress variations (#114-116).
Fabric: 2.5yds (2.29m) x 57″ (145cm) wide Robert Kaufman Ivy Pinpoint Oxford – White, from Fabric.com. 100% cotton, 4.04 oz per square yard. “From Robert Kaufman, this oxford shirting features an oxford weave, smooth hand and full bodied drape. Perfect for creating dress shirts, blouses and fuller skirts. It features cross threads of white.”
Other materials: Sheerweft interfacing. Buttons from Aliexpress.
Mods: Size 42 bust to size 44 hips.
– 1/2″ forward head adjustment, same to sleeve cap; lowered front neck 6mm to smooth out curve created by this adjustment
– Approx. 8mm height removed from sleeve cap and some width to reduce ease to approx. 6mm either side of shoulder notch
– Added 1.5cm length to hem (+1.5cm hem allowance)
– Changed right shirt buttonband to 3cm faux separate buttonband, left to 3cm fold under
– Added 11mm to CB collar/stand on fold (2.2cm total) to true and match wider 3cm buttonband
– Added self-drafted tower placket to sleeve with cuff to match width
*No, I don’t really think I’m as good as Turnbull & Asser. I just want to wear a shirt that James Bond would.
**Yeh, I didn’t prewash. Living life on the edge. Jks, I cut and pre-washed a small square of fabric thanks to this handy tip from Pattern Scissors Cloth.
**It didn’t stain ANYWHERE else in the whole damn shirt, including the undercollar which I marked in the same way.

Great shirt!! I’d love one (or more) of these too.
LikeLike
Thanks! It’s a great pattern if you ever get round to making it up.
LikeLike
OMG! You are sooo talented Siobhan. Looks great like everything you do. ❤
LikeLiked by 1 person
Thank you so much Elizabeth.
LikeLike
Beautiful job!!
LikeLike
Thanks Jenny!
LikeLike
Yes, this fits so well, but is not _too_ fitted. I love it, and a good white shirt cannot be replaced by any other item of clothing. I read about this on Pattern Review, and I wanted to ask you about your favorite reference book. I haven’t got one, and I truly need one. So, which one works for you? And thanks so much, the shirt is just where I want to go with my sewing.
LikeLike
Thanks Becky. My go-to reference books for sewing are Vogue Sewing and Reader’s Digest Complete Guide to Sewing. Either can be picked up secondhand as they’ve been around forever and each edition is as good as the other. For shirts, I like David Coffin’s Shirtmaking, but consider Fashion Incubator’s tutorial page my best reference “book”!
LikeLiked by 1 person
Wow! What luxury! I love the cuffs!This is beautiful!
I have been reading about cutting the button placket in one piece vs band. I’m making a shirt for my son in love. Hope mine looks half as nice as yours! LOL! I’m using African print fabric for his shirt. He’s never had anything matching my daughter’s pretty African prints I make her. ;o)
LikeLike
I find it much easier to cut the button placket in one piece with the fronts – then you don’t have to deal with those fiddly little pieces. Interfacing them is especially painful!
LikeLiked by 1 person
I love your modifications to the pattern. But thanks also for reminding me it is a great basic shirt pattern as is, with the added bonus of being in my magazine stash. For some reason their later patterns involve deletion of features that are essential in a great standard shirt (like cuffs or collars), or lack the darts which make a FBA easier.
LikeLike
I actually bought this separate from their website but it’s so handy to have a pattern in your mag stash already! I agree that darts making fitting a lot easier, I even add them to shirt patterns that are lacking them.
LikeLiked by 1 person
You may be able to get that oil mark out by using ordinary dishwashing detergent. I use a very cheap, non-scented, basic dishwashing detergent. Unscented detergent smells very “industrial” and is an unattractive colour. Most home detergent is scented and coloured to be more acceptable. The cheap, yellow-brown ones don’t have extra colours and scents added. To get cooking spatters or food mark oil stains off T-shirts or shirts, I put drops of the detergent right onto the oil marks. Aldi have a degreaser prewash spray which works reasonably well but straight basic dishwashing detergent works the best for me.
LikeLiked by 1 person
Thanks, Gail. I’ve tried washing up detergent, along with isopropyl alcohol, soap…pretty much everything! The detergent helped but didn’t quite get rid of the stains as they’re kind of set underneath the stitches themselves.
LikeLike
You have such a knack for shirts! I need to wrap my brain around the Fashion Incubator tutorial for the button band, because I hate sewing them on separately (unless using the bias for effect). Kaufman fabrics are usually really nice, so that was a good choice for a “treat yo’self” moment. 😉
Bummer about your pen and the machine grease stains, I’d be mad!! I hate marking on white fabric, but am usually too lazy to use thread and take my chances with tailor’s chalk. (I will never use my Chako liners ever again–they stained a gift once and are now dead to me.)
LikeLiked by 1 person
Sewing buttonbands on separately is such a pain! I don’t know if I could bring myself to do it again. If it helps with this method, when cutting out I start from the CF marker on the right front, then add 1/2 my desired buttonband width + buttonband width + 12mm (1/2″) for pleat. So if I were making a 3cm buttonband as in this case, I add 1.5cm + 3cm + 12mm = 5.7cm from pattern centre front, fuse the part 3-6cm from cut edge. And once you’ve got it cut out and fused, it makes a lot more sense (even if you just practice on paper first) – it’s just turned under 3cm (or buttonband width) first, turned under again as if you were making a regular cut-on buttonband, but sewn as a pleat at 6mm then folded out again. This is probably not making a lot of sense haha but once you can visualise that process it becomes a lot easier. I choose 3cm wide bands as you need to stitch 6mm from the edge and that becomes quite close in a 2.5cm wide band.
Chako liners are dead to me too! Bright blue line down a beautiful dress bodice CF. Never again. 😡 I actually don’t get the hype as I didn’t find them particularly easy to use.
LikeLiked by 1 person
Your Story video was beyond helpful, but I appreciate the word description too: you rock! (And I cannot argue with your results, because you are a #shirtboss)
And OMG YES those f*cking liners were not at all easy to use. They snagged on fabric, they put out no chalk sometimes, and then the staining was the final straw. Group bonfire, perhaps? 😉
LikeLiked by 1 person
I’ve just made the dress version of this pattern and I will use it for future shirts for sure. I need to read about the faux placket, it looks great. I can’t figure out yet why you had to add 2.2cm tot he collar band but hopefully it will be clear after I go through the FI article.
I’ll have a browse for buttons too, thanks for the tip! I bought some rings and sliders from Aliexpress and they were cheap, good quality and arrived in less than a week.
I love the yellow Chaco for dark fabrics, it’s the only liner I found that works on most fabrics.
LikeLike
I had to think about why I added that 2.2cm too haha. Partly it was to true the collar stand to the neckline, as I had lowered it slightly which made the curve longer. But most was because I increased the buttonband width from 2.5 to 3cm, hence the stand needed to be longer to match.
AliExpress is great, isn’t it? I wouldn’t have thought of buying rings and sliders there. Thanks for the Chaco liner tip but after the blue one stained right down the front of a dress I’m wary haha
LikeLike
It looks great! I sew want to find a shirt pattern that works this well for me, I think I’d love the process. It just seems like getting a pattern like this down would leave you open to so many possibilities. I think the cuffs draping a little over the hand would be great in the winter for sweaters, and in the summer you’d often have them rolled up anyway, maybe? That’s how I wear them.
Also, I agree with others that I’d be super annoyed at the pen, but your attitude is great, not letting it ruin a great shirt. It’s just principle of the thing…. 🙂
LikeLiked by 1 person
Yes, I often wear my shirt sleeves rolled up but the cuffs are actually a little too wide (long?) to accomplish this, which is another reason I’d like to shorten them slightly. The process of shirtmaking is definitely enjoyable if you like technical detail.
It is the principle of the thing! Danged pens. I hardly notice the marks when I wear it now.
LikeLiked by 1 person
Cuff thickness – Ahhhh, I see what you mean!
LikeLike
Bummer on the stain but I love the shirt!! I love a crisp white dress shirt, nice job!
LikeLiked by 1 person
Me too! Thanks.
LikeLiked by 1 person